
In order to use springs in all their splendour, we will present a third example before
explaining the element spring.
Save the following code under editor/XML/Examples/example3.grp :
    <?xml version="1.0" encoding="ISO-8859-1"?>
    <!DOCTYPE grp SYSTEM "../grp.dtd">
    <grp>
      <vbox>
        <hbox>
          <tbox fontSize="30" fontStyle="italic">Hello</tbox>
          <spring/>
        </hbox>

        <hbox>
          <tbox fontSize="30" fontStyle="italic">world</tbox>
          <spring/>
        </hbox>

        <hbox>
          <tbox fontSize="30" fontStyle="italic">!</tbox>
          <spring/>
        </hbox>
      </vbox>
    </grp>
We will use the same definitions document than previously. In a console, change to directory
editor/XML/Examples (if not already done), and then type :
java -cp ../../lib/taxi.jar fr.loria.taxi.transformer.TransformerGRPToSVG -grp_in example3.grp -defs examples.def -svg_dtd ../svg.dtd
You should see the following output :
    Parsing file examples.def
    Parsing file example3.grp
    Creating SVG document
    Generating SVG file example3.svg
The document example3.svg in the directory editor/XML/Examples has
been generated. It looks like that with the Adobe plugin :
Instead of using only one tbox to hold the text Hello world !, we
used 3 tbox separated by 2 springs.
The following picture shows the structure of the boxes :
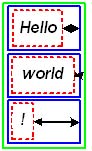
The outermost box is a non-final box vbox. This box must contain at least one
box (final box like tbox or non-final box hbox only). The boxes added
to a vbox are located along the Y axis. All the boxes contained by a vbox
must have the same width (we will detail this later when discussing about non-final boxes).
In our example, 3 hbox are
placed in the vbox. We chose not to separate these 3 hbox with
springs. The vbox is displayed in green on the picture above.
Our 3 boxes are built according to the same template : each contains a tbox and
a spring. They are displayed in blue on the picture above. You can notice that they all
have the same width because contained in the same vbox (they also have the same height
but this is not an obligation).
To make the 3 hbox the same width, the spring (arrows on the picture above)
they contain stretched.
The 3 tbox are shown in red dotted line border.
When the process of transformation is running you can get some extra information that can helps to debug (very usefull when working with huge or complex structure) or just to see the structure.
Type the same command line that previously, just add the -debug parameter :
java -cp ../../lib/taxi.jar fr.loria.taxi.transformer.TransformerGRPToSVG -grp_in example3.grp -defs examples.def -svg_dtd ../svg.dtd -debug
You should see the following output :
    Parsing file examples.def
    Parsing file example3.grp
    Creating SVG document
    Generating SVG file example3.svg
When the transformation is done, the following window appears (on the picture below, the window has been resized and all nodes expanded) :
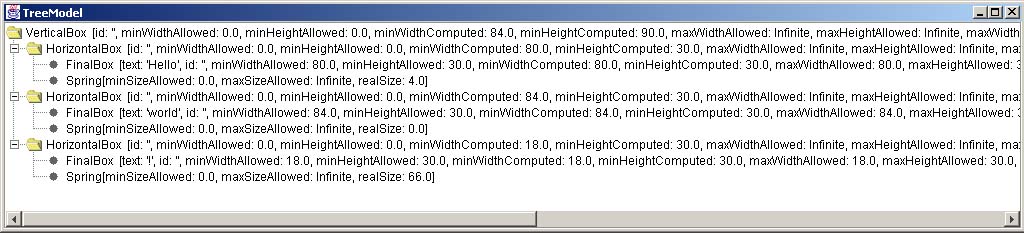
The window shows the structure of your GRP document (intermediary document) as a tree. Each node represents an element of the structure. Many other pieces of informations are available, we will discuss them later.
Document example3.svg in the directory editor/XML/Examples now looks like
that :

Boxes are shown with the same colors introduced in paragraph 2.1., and springs
are arrows. You may not see all the boxes (this is the case with the vbox and the 3
hbox) as their border overlap, and may have some difficulty to see small springs (you can
zoom in the SVG graphic if your viewer affords it).
Now, let's see spring element in detail.